
Want a longer lasting mani that applies smoother? It’s not very glamorous or fun, but I promise you that it makes ALL the difference. It doesn’t matter what you’re putting on your nails, you want to make sure you’re prepping your nails before you start.
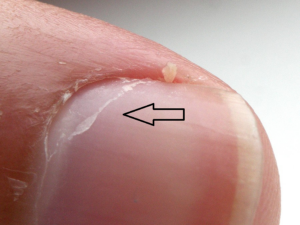 Your nails can have all kinds of obstacles that can prevent a mani from lasting as long as it could. Natural oils, dirt, skin, invisible cuticle… all these thing can impair getting that perfect mani you’re looking for. I never paid that close attention to my nails before and I had no idea about invisible cuticle. I used to think that just pushing back my cuticle at the base of my nail was good enough and didn’t realize the thin coat of cuticle that is clear that grows up your nail, especially on the edges, is basically skin coating your nail if left to grow. Your wrap, lacquer or gel (strips or bottles) won’t adhere to that skin and will peel up super easy as soon as any moisture gets near it – the same reason I always say to mind the gap and make sure your nail product isn’t touching your skin or cuticle.
So that’s the first thing you want to get rid of. You can get cuticle softeners to assist with making this easier. Put it on your nail and leave it for a minute or two to let it soften everything up. Then use a metal cuticle spoon or wooden cuticle stick to get it all off, being careful about the amount of pressure and angle so you don’t damage your nail.
Next you want to wash your hands. I recommend using a dish soap, as it’s meant to cut through grease and that will help get rid of any natural oils on your hands as well as wash away any excess cuticle remover because you don’t want to leave that stuff on. Just make sure you’re not using one of those dish soaps that has an added moisturizer in it, as it can leave a film on your hands and nails like using a cream.
Final step is to wipe with alcohol or white vinegar. I like to use the little alcohol prep pads you can find at the drugstore. This helps even further with getting any oils off your nails and also helps dry them out a little so your product has a nice dry and clean surface for application.
Check out my video tutorial where I show you how I do all the steps above.
Did you learn something new about prepping your nails to get a better application? I’d love to hear about your results! Comment below with how it helped you or with any questions!
Until next time, xoxo
1 thought on “First Step – Prep! With Video Tutorial”
Comments are closed.